Itai Weiss
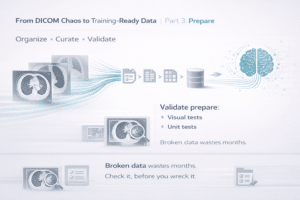
In Part 1, we introduced a 3-layer testing framework for AI projects: unit tests, smoke tests, and golden set tests. Now let’s look at how to actually set this up with pytest and GitLab CI—including the infrastructure details that tutorials often skip.
Organizing Your Tests
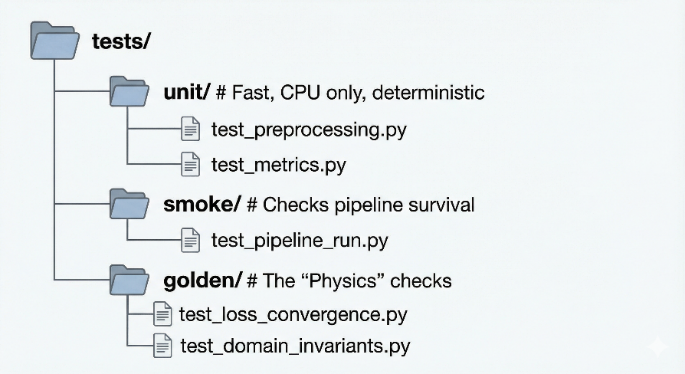
Create three directories matching the framework: tests/unit/ for fast deterministic tests, tests/smoke/ for pipeline sanity checks, and tests/golden/ for fixed dataset tests. Use a conftest.py to automatically apply pytest markers based on directory. This lets you run each layer separately with pytest -m unit or pytest -m golden.
The Pipeline
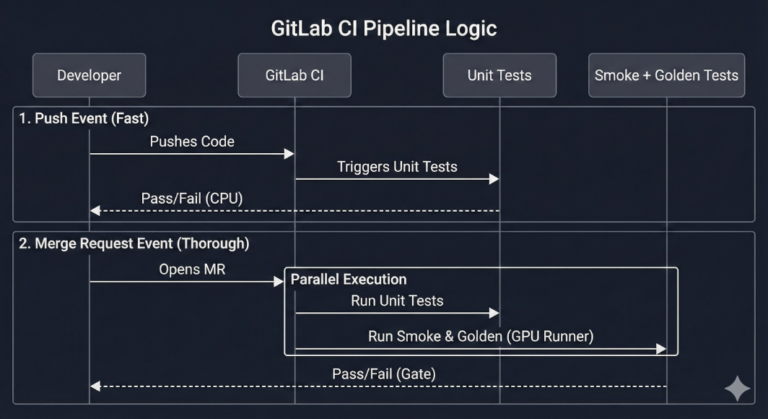
Your .gitlab-ci.yml should define two jobs. The first runs unit tests on every push—these are fast and catch logic errors immediately. The second runs smoke and golden tests only on merge requests—these take longer and may need GPU access, so you don’t want them blocking every commit.
Here’s an example for such .yml file:

Registering a Runner
Most runner setup guides start at config.toml, but the first real decision is how the runner is attached to a project. In modern GitLab, the recommended flow is: create the runner in the GitLab UI to get a short-lived runner authentication token, then register the runner from the server so it writes its local config.toml.
In the GitLab UI (project runner)
- Go to your project → Settings → CI/CD.
- Expand Runners, then choose Create project runner.
- Choose the OS where the runner will run.
- Set Tags (for AI work, tags like gpu / cpu are worth being strict about). If you don’t want this runner picking up random jobs, don’t enable “run untagged”.
- Create the runner and copy the runner authentication token (tokens typically look like glrt-…). This token is only shown briefly during the creation/registration flow.
On the runner host (server-side registration)
After you’ve installed GitLab Runner on the machine, run the interactive registration:
You’ll be prompted for:
- GitLab instance URL
- Runner authentication token
- Runner description
- Job tags
- Executor type (use docker for the containerized workflow)
Once you finish registration, GitLab Runner saves everything locally in config.toml. Treat that file like a secret: it contains the runner authentication token, and anyone who gets it can potentially “clone” the runner identity.
Setting Up the Runner
For AI projects, use GitLab’s Docker executor rather than the shell executor. Each job runs in a fresh container, which gives you isolation and reproducibility. You’ll need to install NVIDIA Container Toolkit on the runner host so containers can access the GPU. Configure the runner with runtime = “nvidia” to enable GPU passthrough.
Mounting Data and Resources
Here’s what tutorials often miss: your development container and your CI runner need access to the same data. If you’re using NFS mounts for datasets in your devcontainer, configure the runner to mount those same paths into CI containers. Add volume mounts in your runner configuration—for example, mounting <HOST_GOLDEN_DATA_PATH>:<CONTAINER_GOLDEN_DATA_PATH>:ro for read-only dataset access and
<HOST_GOLDEN_DATA_PATH>:<CONTAINER_GOLDEN_DATA_PATH>:rw for scratch space. This way, golden tests can access fixed datasets without copying anything.
For PyTorch projects, also increase the shared memory size in your runner config. The default is too small for DataLoader with multiple workers, and you’ll get cryptic crashes without it.

Final Thoughts
Most AI CI failures aren’t bugs—they’re symptoms of a system that changes every week. This 3-layer framework gives you rock-solid logic tests, pipeline survival checks, and behavioral sanity grounded in domain knowledge. Once your runner is configured with GPU access and the right data mounts, CI becomes a tool that works with your AI system instead of against it.
Here’s the question to leave with: what are the domain rules in your problem that you can turn into golden set tests tomorrow?